Screen Test · For doctors and their teams

The only ask: One Portrait Session

To put a doctor on screen, we need a set of clear reference photographs of them, and if they speak in the film, a short voice recording. Your team takes the pictures. We build the lighting, the wardrobe, the environment and the film around that likeness. Here's what good reference looks and sounds like, and how to send it.

01 · The modeling

The photos set the likeness. We direct everything else.

Continuas AI · Investor film · 0:53
Nobody filmed these two

Tim and Gavin Devereux, co-founders of Continuas AI, in an investor film made with this process. Neither was filmed. We modeled both: likeness, delivery, lip sync.

Watch the mouths and the light on their faces. That's the standard we hold every Screen Test to, doctors included.

We develop the photographic look of each character through specific prompt structures, making deliberate choices about virtual camera and lens settings, camera angle, depth of field, lighting and composition. Those choices shape how the face is presented, how light falls across the features, and how the doctor stands out from the background.

We can explore softer, more flattering lighting, natural skin tones and different environments to give the image depth and a cinematic finish.

The reference photographs establish the doctor's appearance. Our work builds the visual treatment around that likeness, giving the finished character the attention to lighting and composition you'd expect from a professionally directed portrait.

For a narrative :60, those decisions run across a whole sequence. We hold continuity shot to shot, then shape the edit, pacing, sound and finish.

Camera & lens
How close we feel, how faces are drawn, how much of the room comes along.
Angle
Eye level, slightly above, slightly off-axis. Each one reads differently.
Depth of field
How sharply the doctor separates from the space behind them.
Lighting
Soft and flattering, warm or clinical, matched to the setting.
Environment
Treatment room, consult office, front desk, or somewhere else entirely.
Wardrobe
Scrubs, lab coat, the practice's own branded wear, built from the detail shots.
02 · What goes in, what comes out

Two frames in. Three portraits out.

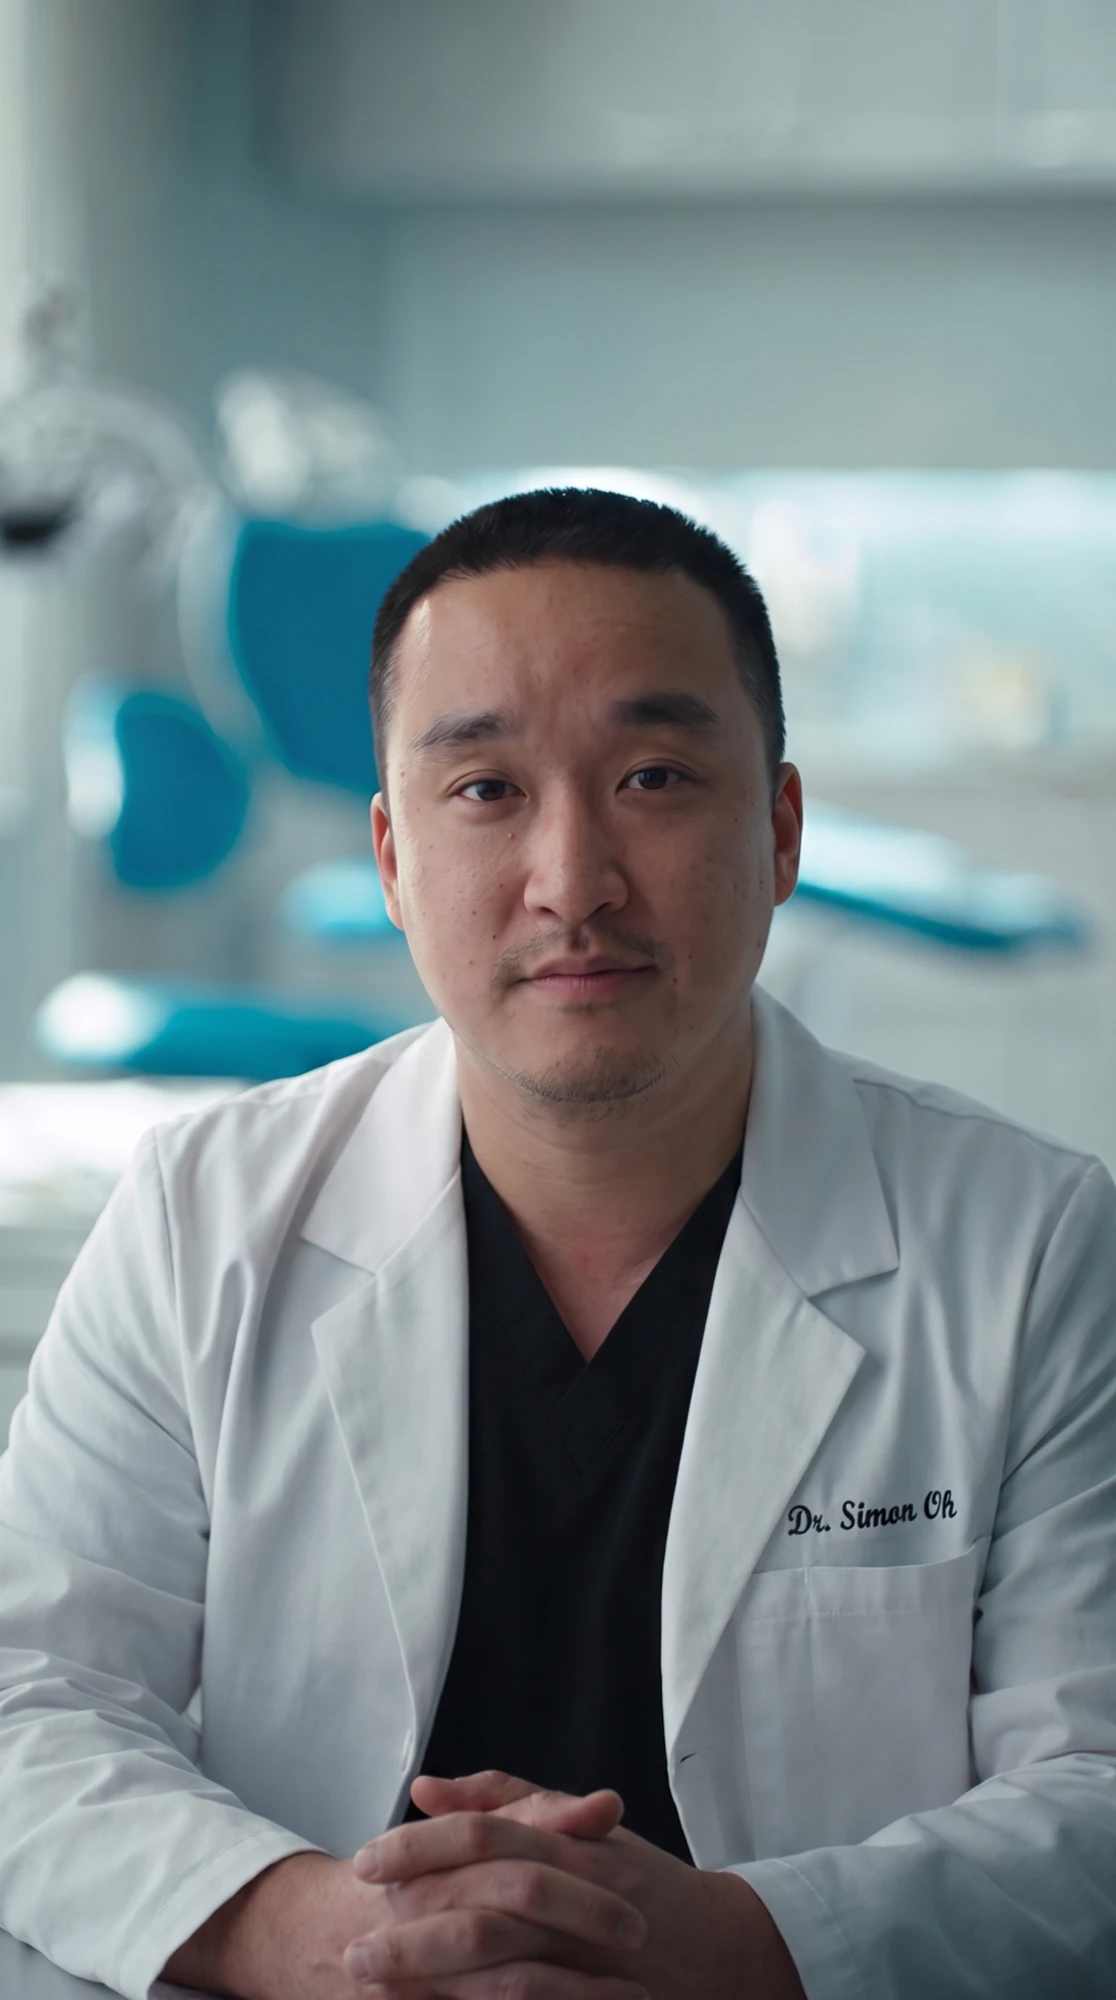
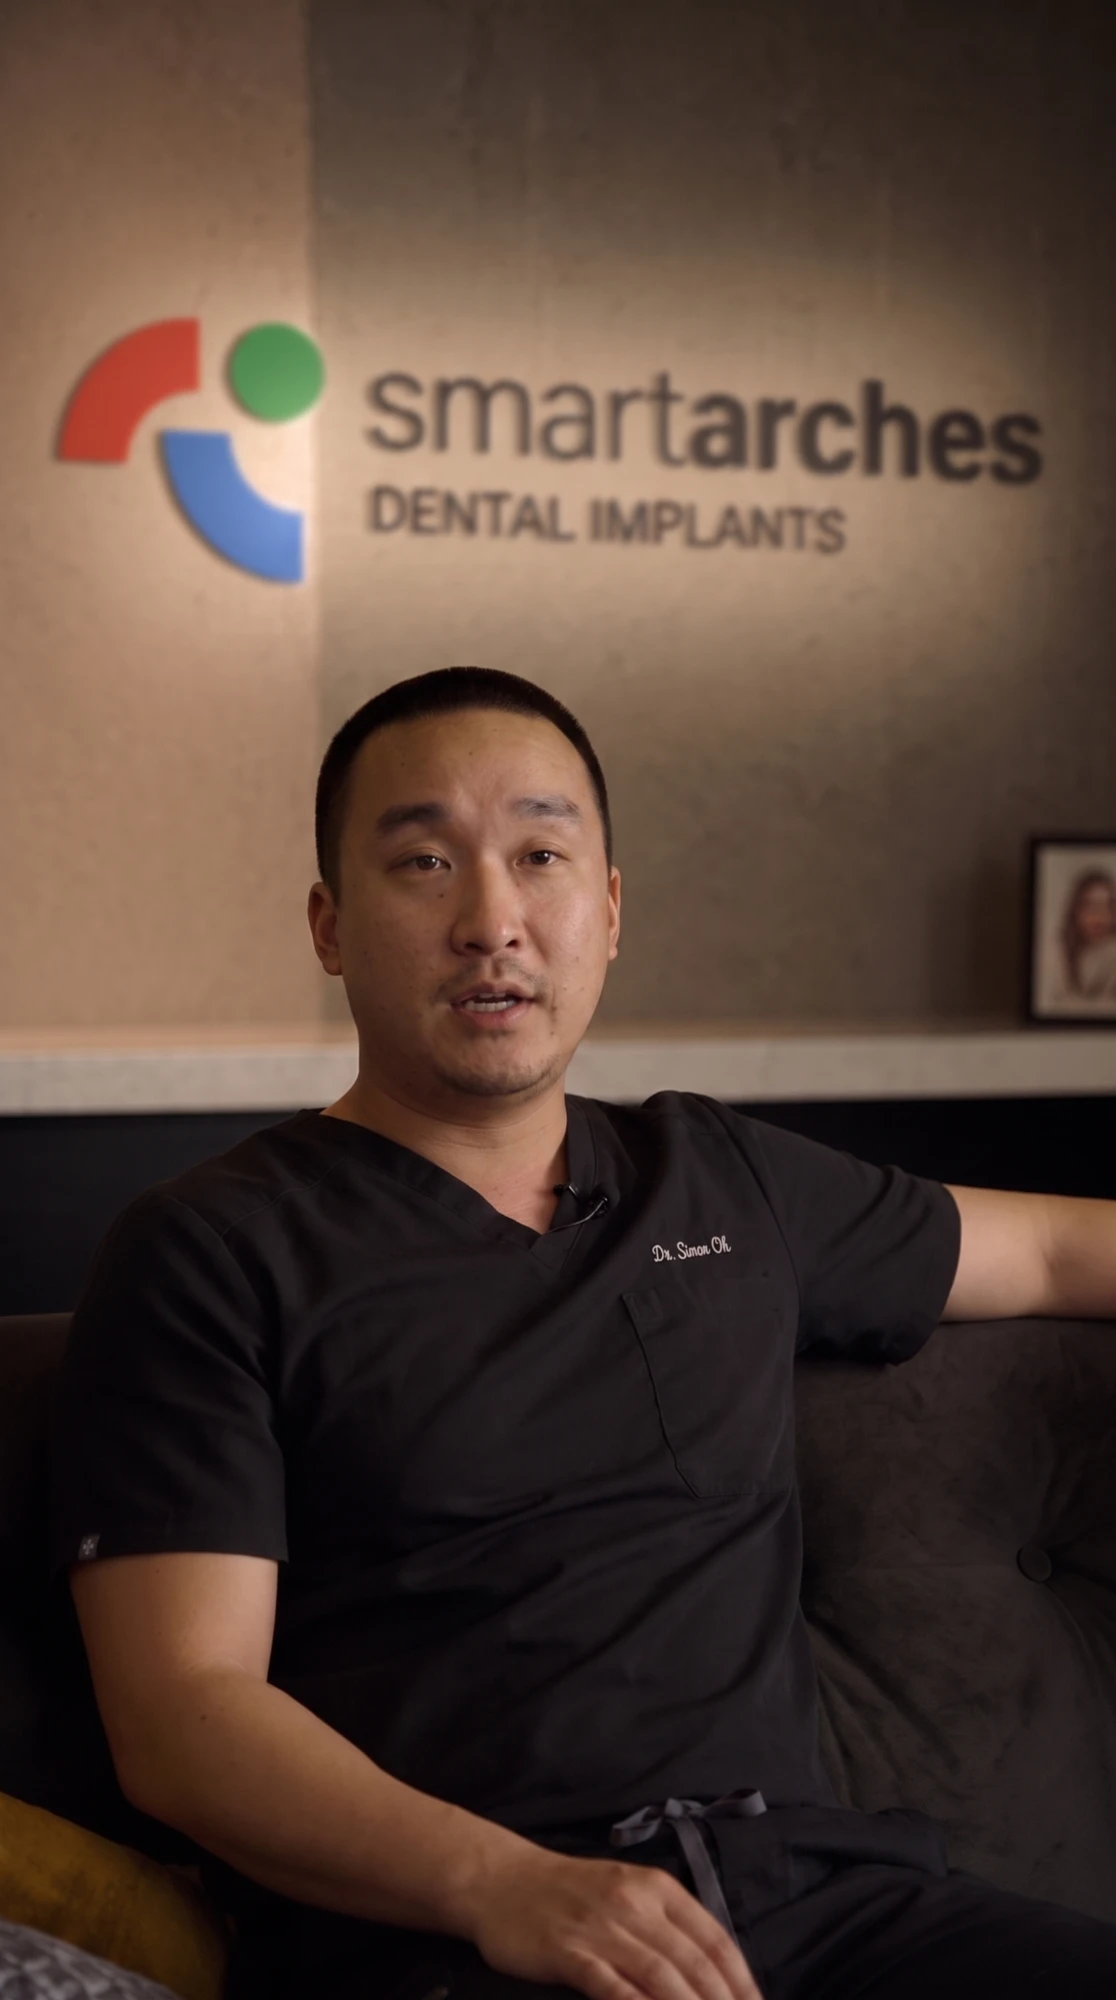
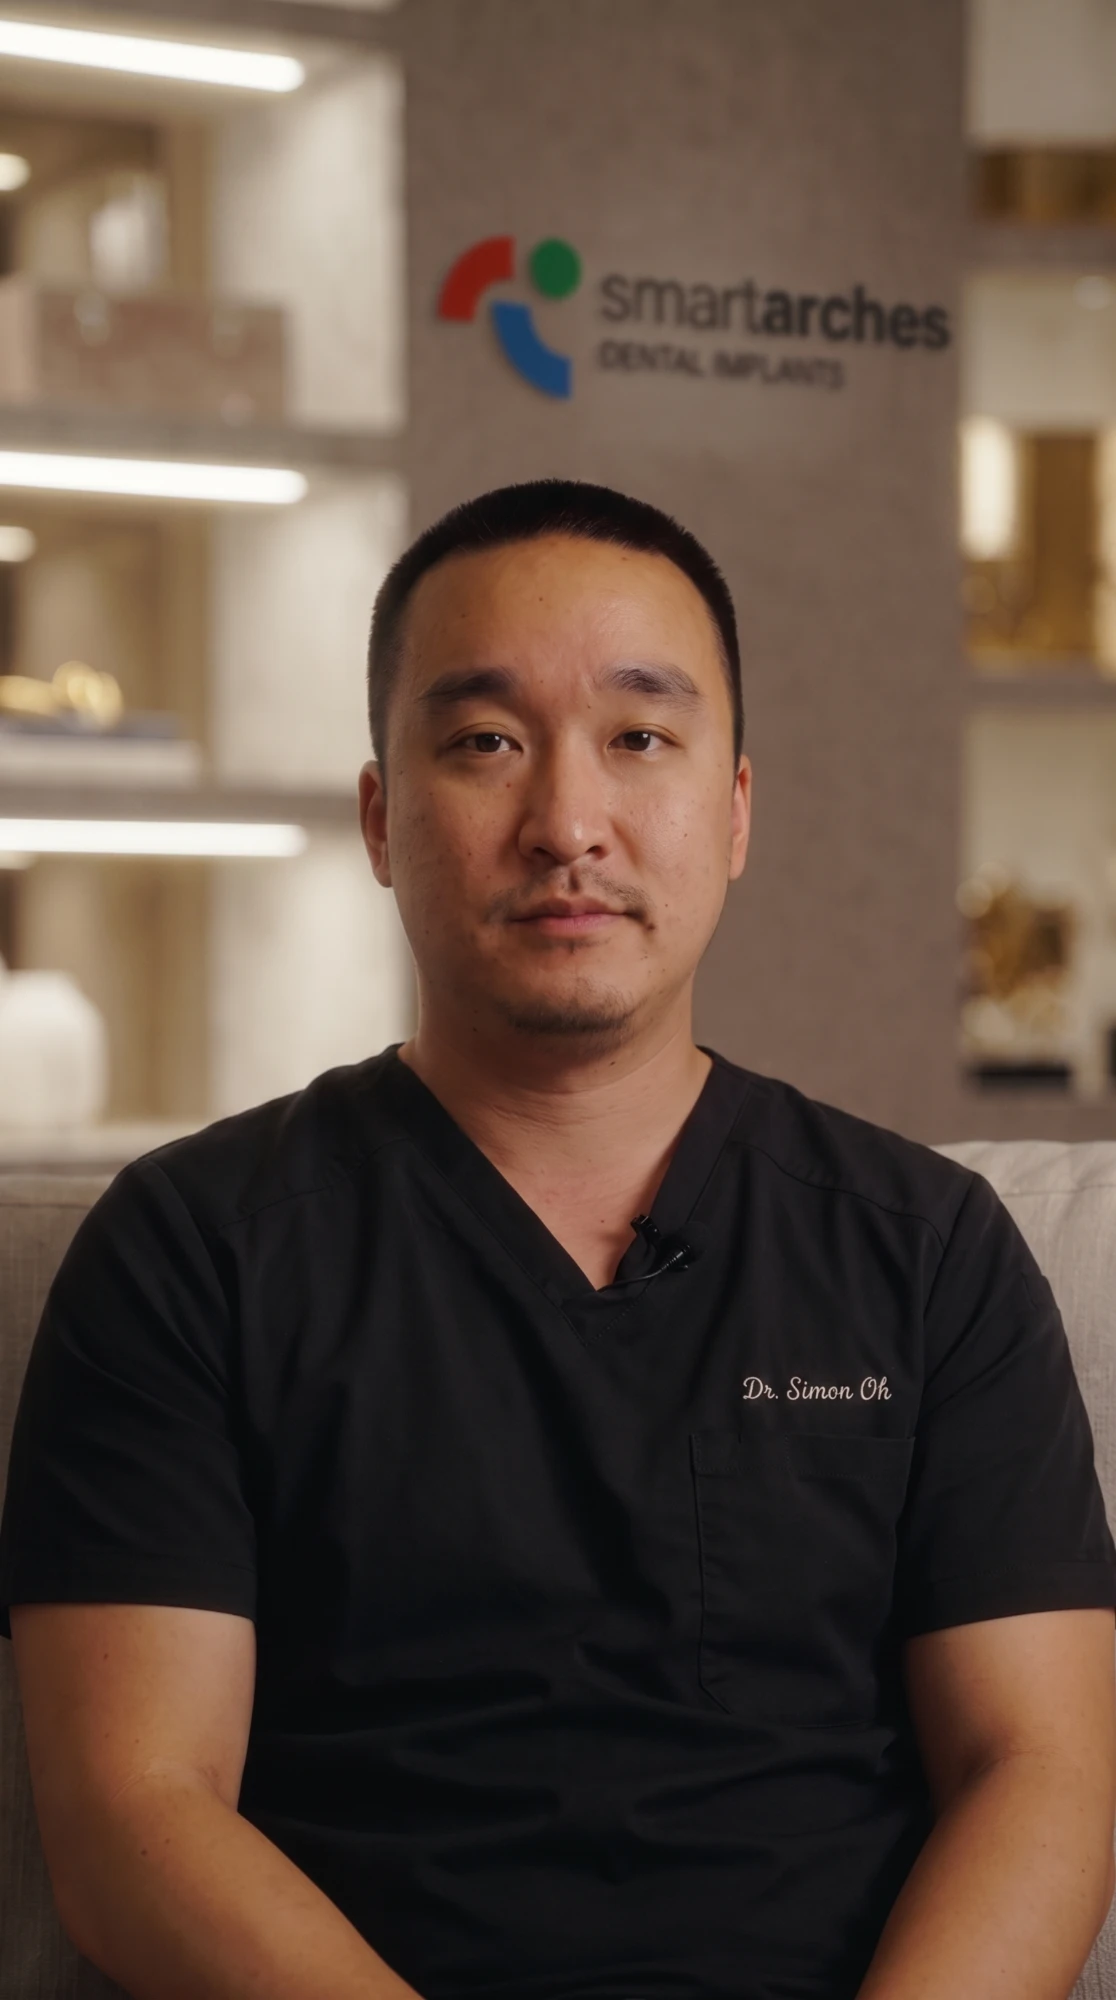
Dr. Simon Oh of Smart Arches Dental Implants. His practice sent us interview footage they'd already shot in 4K. We pulled a front-facing frame and a turned frame, and that was the reference. Everything on the right was built from it. That's enough for stills; a doctor who speaks and moves on screen needs the full series below.

INThe reference
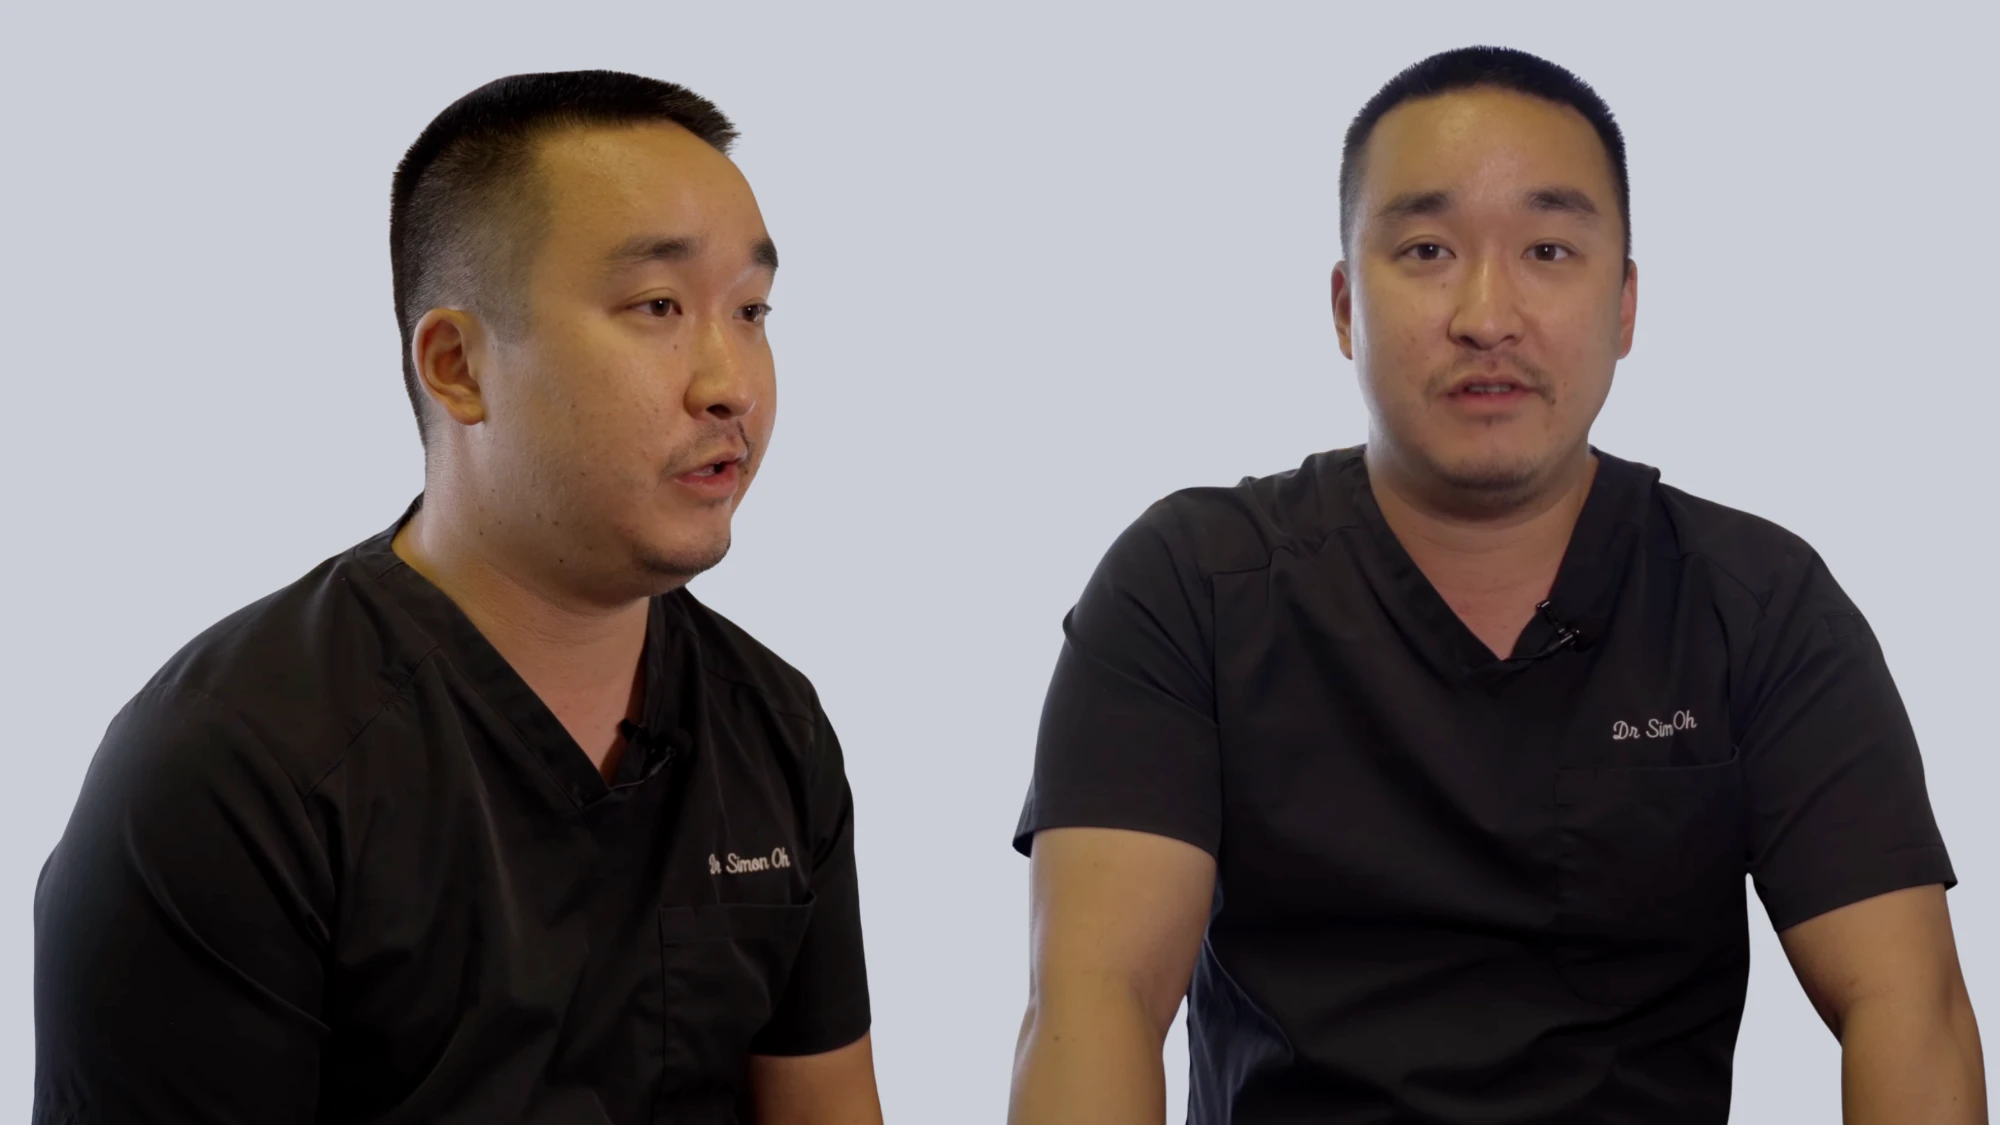
Two frames of Dr. Simon Oh in black scrubs against a plain grey backdrop, one turned slightly to the side, one facing camera.
Plain backdrop, soft even light, sharp eyes. One turned view, one front-facing. Nothing fancy, and that's the point: clean reference gives us more to work with than a styled photo does.
OUTThree treatments
Dr. Oh in a white lab coat, hands folded, in a softly lit treatment room.
Treatment room
Dr. Oh seated on a sofa in warm light below the Smart Arches logo.
Warm lounge
Dr. Oh seated facing camera in front of lit shelving and the Smart Arches logo.
Front office

Same person, three directions. New lighting, new wardrobe, new setting, new framing, and still recognizably him. The reference only had black scrubs; the lab coat is wardrobe we added. His embroidered name carried through because it was legible in the reference.
03 · The essentials

Best practices for the reference shoot

For whoever's behind the camera. This is our creative team's capture spec, and every point shows up in the finished film: a soft photo becomes a soft animation, and a shadow across the face becomes something the model has to guess at.

  1. 01

    Light it soft, even and from the front

    Window light or a softbox, ideally in daylight. Keep the key light on the front and sides of the face with subtle fill. No harsh directional light, and no backlight or rim light: it looks great in a normal portrait but hides the features we need.

  2. 02

    Eye level, chin level, lips slightly parted

    Every shot from about eye level. Chin neutral with a slight downward tilt, never tipped up. A warm but neutral expression, subtle confidence rather than a big emotion. Mouth slightly open, not pressed shut and not a full smile; that's what lets us build natural lip sync.

  3. 03

    Clear the face for speaking roles

    Glasses, hats and hair over the brow cover the landmarks we map expression from. Shoot one close-up with glasses on, then the rest with them off. If hair normally covers the forehead, take 3 to 4 medium close-ups with their usual styling, then shoot the series with it pulled back.

  4. 04

    Keep their appearance natural

    Usual grooming, minimal makeup, real skin texture. No beauty filters, no skin smoothing, no retouching. Heavy makeup and extreme hairstyles don't hold up well across expressions.

  5. 05

    Shoot the wardrobe on its own

    If a particular lab coat, uniform or embroidered name needs to appear, give us 2 to 3 full-height shots of it, front and back, plus a side if there are details you can't see from either.

  6. 06

    Simple background, one person, one setup

    An uncluttered wall with no one else in frame. Keep the same lights and camera height for the whole session, so every photo matches the others.

04 · The shot series

Three framings. One lighting setup.

Not one perfect photo: the same person from every side, at three distances, under the same light. The camera stays put and the person turns. About 18 photos plus a few extras, all from eye level.

0° FRONT30–45°30–45°90°90°120–135°120–135°180° BACKCAMERA · EYE LEVEL

Solid marks are used in every framing. Dashed 120 to 135° turns are for the medium close-ups only.

4PHOTOS

Full body

35mm full-frame equivalent · straight on

Head to feet, with arms, hands, hair and clothing all in frame. Hands relaxed at the sides, slightly away from the body.

FrontLeft sideRight sideBack
6PHOTOS

Medium

45 to 60mm · waist up

From the waist to just above the top of the head.

Front, chin level30–45° right30–45° left90° right90° left180° back
8PHOTOS

Medium close-up

75 to 90mm · head and shoulders

Top of the head to the shoulders. Eyes open, lips slightly parted. The face fills about 60% of the frame, with the hair and both shoulders in and nothing touching an edge.

Front, chin level30–45° right30–45° left90° right90° left120–135° right120–135° left180° back
+

Extras, when they apply

Before the series
1 close-up with glasses on3–4 medium close-ups, usual hair2–3 full-height wardrobe shots

The full series is for anyone with a speaking role. Someone who only appears in a group shot and isn't featured doesn't need the glasses and hair steps.

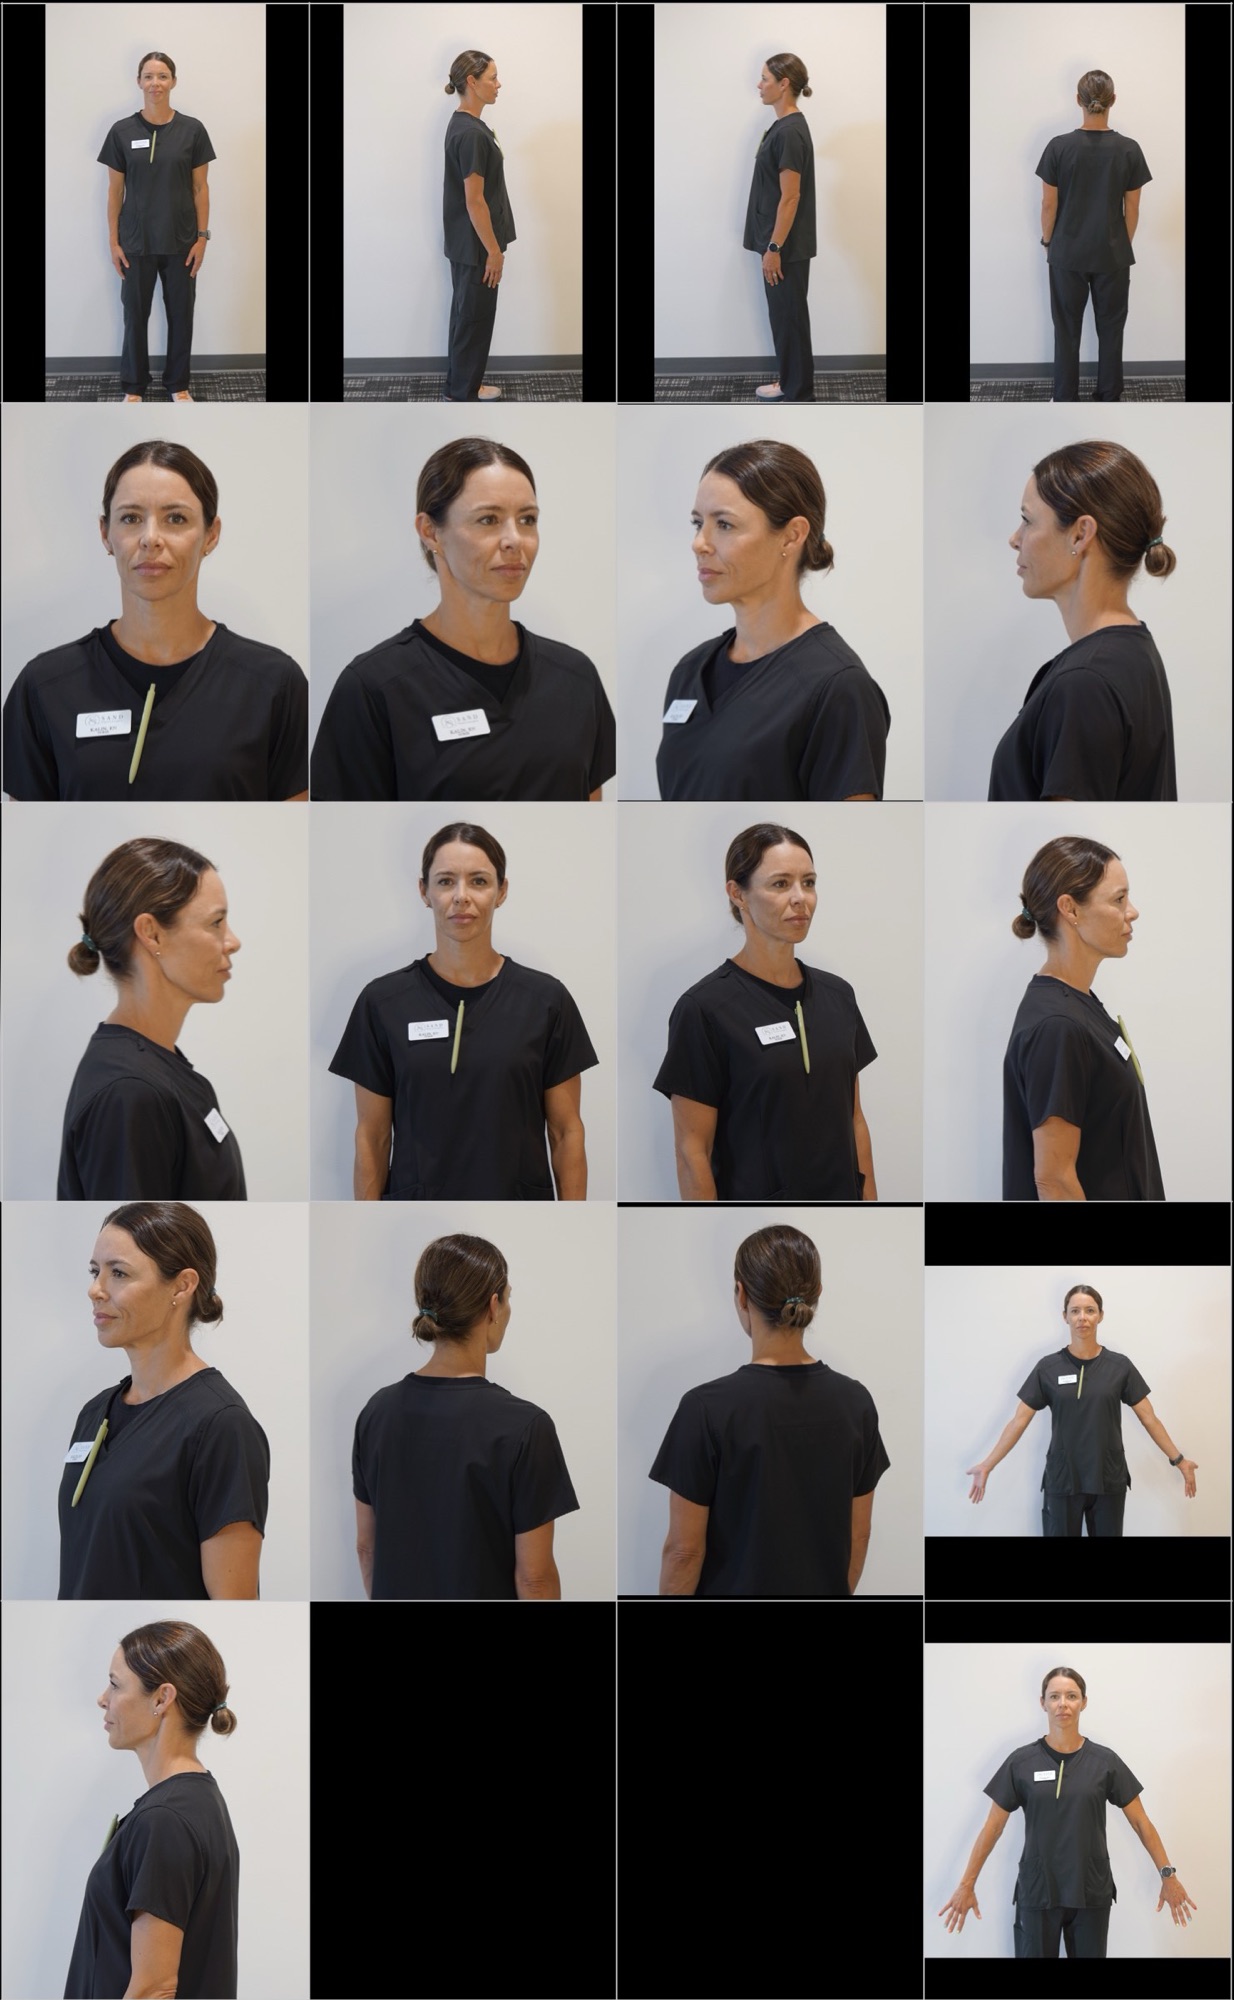
Contact sheet of one person in black scrubs against a plain white wall: full-body front, both sides and back; medium close-ups turning from front through three-quarter, profile and away; mediums through the same turns; and two full-body shots with arms held slightly away from the body.
What a finished set looks like

One wall. One light. Every angle.

A real reference set from our creative team. Top row: full body, front, both sides and back. Below: the medium close-ups and mediums turning through the angles, then two full-body shots with the arms held slightly away from the body.

Notice what's missing: no glasses, no hair over the brow, no shadows, no props, nobody else in frame. And the uniform details, like the name tag, read clearly from the front, which is what we need if they have to appear in the film.

05 · For the photographer

Camera settings and a final check

A full-frame camera and a proper portrait setup. If you're handing this to a photographer, this is the part to forward.

Format
RAW, lossless or low-loss. 4K minimum; 6K or 8K is better.
Sensor & frame
Full frame. Landscape 16:9 preferred.
Lens
As listed for each framing. Nothing wide on faces. No visible aberration, vignetting or flare at the set aperture.
Aperture
f/3.5 to f/5.6 (f/8 is fine). Sharp from eyebrows to chin to ears and the front of the hair.
Shutter
1/125 to 1/250 to rule out motion blur.
ISO
Whatever the light needs. Sharpness matters more than noise.
Light
Daylight balanced, 5500 to 6500K at 97+ CRI. Same setup all session, or at least the same key-to-fill ratio and color temperature.

Can't get a shoot together? Clean 4K video of the person facing camera can work. It's how Dr. Oh's portraits above were made. The full series gives us much more to work with, especially for a doctor who speaks on screen.

06 · Voice capture

Two minutes of clean voice

If the doctor speaks in the film, we model their voice too. That needs a clean, unprocessed recording of them reading aloud. Same rule as the photos: clarity beats polish, and the room matters more than the mic.

Pick a small, soft room
Carpet, curtains, a sofa, bookshelves. A closet full of clothes makes a classic home vocal booth. Avoid empty rooms, kitchens, bathrooms and glass-walled meeting rooms, and keep away from windows, glass and hard tabletops. They echo.
Kill the noise
Turn off HVAC, fans and anything with a compressor; in a practice that includes suction and handpieces. Silence notifications, put phones in airplane mode, close the windows.
Clap once
If you hear a ring or an echo, add blankets or pillows, or move rooms.
Keep the mic close and steady
A clip-on lav mic on the chest, or a phone about 6 to 8 inches from the mouth, slightly off to one side. Same distance for the whole session.
Set the levels
Speaking normally, peaks should land around −12 to −6 dB. Never let them hit 0 dB: that clips, and clipping can't be fixed afterwards.
Turn off the processing
Disable noise suppression, auto-gain and “voice enhancement” in Zoom, Teams, Windows, macOS or the phone's recording app. We want the raw voice and do our own processing.
Record uncompressed
WAV, 44.1 or 48 kHz, 16- or 24-bit. Only if WAV isn't possible, a 320 kbps MP3.
07 · For the doctor

Show up as you. Sit for a few photos. Done.

Come with your usual grooming. Keep makeup minimal. The film should look like the doctor patients meet.

Glasses or hair over your forehead? We take a few shots your usual way first, then the rest with glasses off and hair back, so we can see your brow.

Bring the coat or scrubs you want on screen. We'll photograph it front, back and side.

Stay relaxed and warm. Lips slightly parted rather than a big smile, while the photographer turns you through a set of angles. No lines to learn. For voice, about two minutes reading from a favorite book and a short passage from a professional journal.

08 · Sending files

One folder per doctor. One link.

Organize the RAW photos and WAV audio by doctor and by framing. We want uncompressed files, so send them through a proper file transfer service: Box, Dropbox, WeTransfer, Google Drive or SharePoint. Zip the folder if that's what it takes to get it to us intact.

Name the folders so we can tell who's who without opening anything.

Send us the link
Practice Name - Screen Test/ ├── Dr-Lastname-Firstname/ │ ├── 01-full-body/ # 4 │ ├── 02-medium/ # 6 │ ├── 03-close-up/ # 8 │ ├── 04-extras/ # glasses, usual hair, wardrobe │ └── voice/ │ ├── 00-room-tone.wav │ ├── 01-book.wav │ └── 02-journal.wav └── Dr-Lastname-Firstname/ └── ... # same set for each doctor